Eating Normal
  • Home
  • Support Us
  • Recipes
  • Restaurant Reviews
  • Writing
  • Cookbook of the Month
  • Archive

Chicken and Stuffing Waffles

11/30/2020

0 Comments

 
Thanksgiving Leftovers need a makeover every year. There are only so many moistmaker sandwiches the country can take. This is how we do it in the Eating Normal House: Chicken and Stuffing Waffles. At home frying can be intimidating, so if the chicken isn't for you, skip to the bottom for the waffles recipe only.
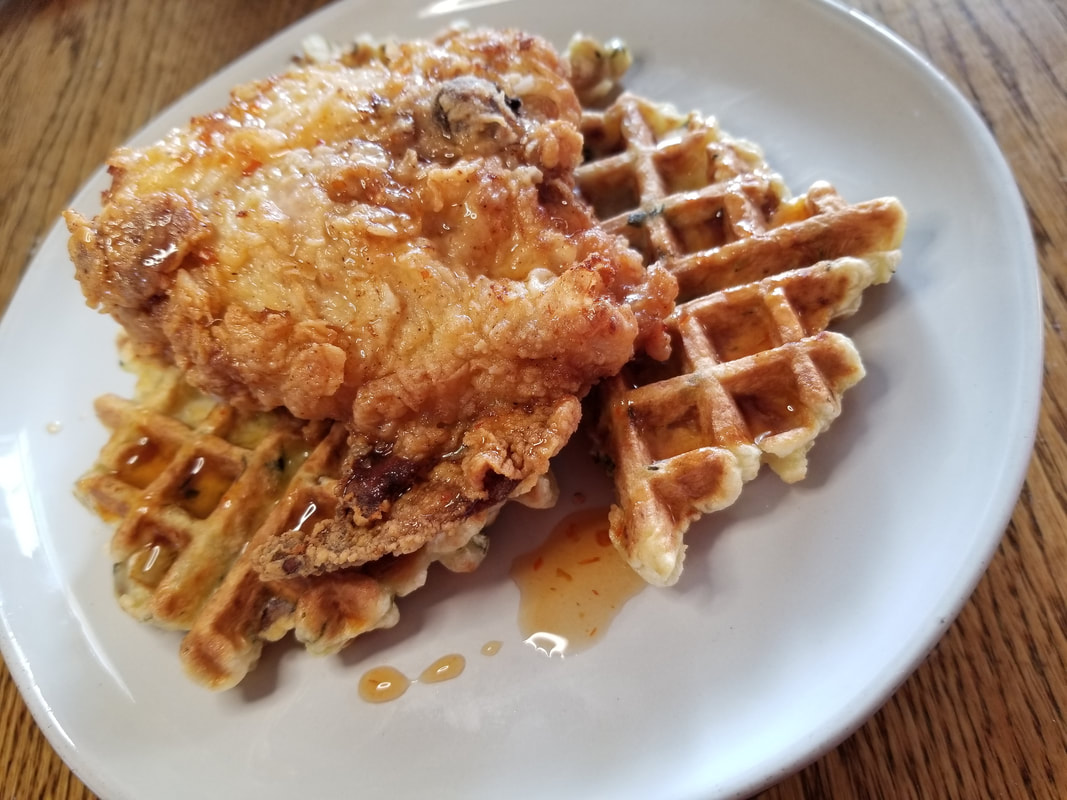
Picture

The chicken:

  • 2 Cups AP Flour
  • 1 and ¾ tsp salt
  • 1 tsp onion powder
  • ¾ tsp garlic powder
  • ¾ tsp ground mustard
  • ½ tsp paprika
  • 1 tsp cumin
  • Generous fresh cracked pepper
  • 2 cups buttermilk for marinade
  • Hot sauce for marinade of your choice
  • 3 lbs of your preferred chicken parts
  1. Start preheating your oil before you marinade the chicken. The amount of time it takes to come up to temp around 300 degrees (which is a lot and scary at home, so if you start lower be mindful it will take longer to cook), your chicken will have enough time in the buttermilk/hot sauce marinade.
  2. Mix spices and flour and set aside. When your oil is ready, dredge your chicken in the dry flour mixture and add to oil one or two pieces at a time depending on what you’re cooking. My husband and I are partial to chicken thighs and often have them in the freezer. These take about 10 minutes to become golden brown and mostly cooked. If your internal temp is low and your crust is dark, you can place your chicken in the oven to bring it to 165 internally.

Waffles
  • 1 and ¾ cups chopped stuffing leftovers
  • 1/2 cup flour
  • ½ cup milk
  • 2 eggs

  1. Preheat your waffle iron on the 4th setting. Chop up your stuffing into even smaller cubes.
  2. Mix in eggs, flour, and then milk until a thick batter consistency is reached. Spoon in one ladle at a time into the waffle maker. It will be thicker than a traditional waffle.
  3. Serve with chicken and a maple syrup and hot sauce drizzle.
​
0 Comments

Eating Normal Dressing

11/28/2020

0 Comments

 
Picture
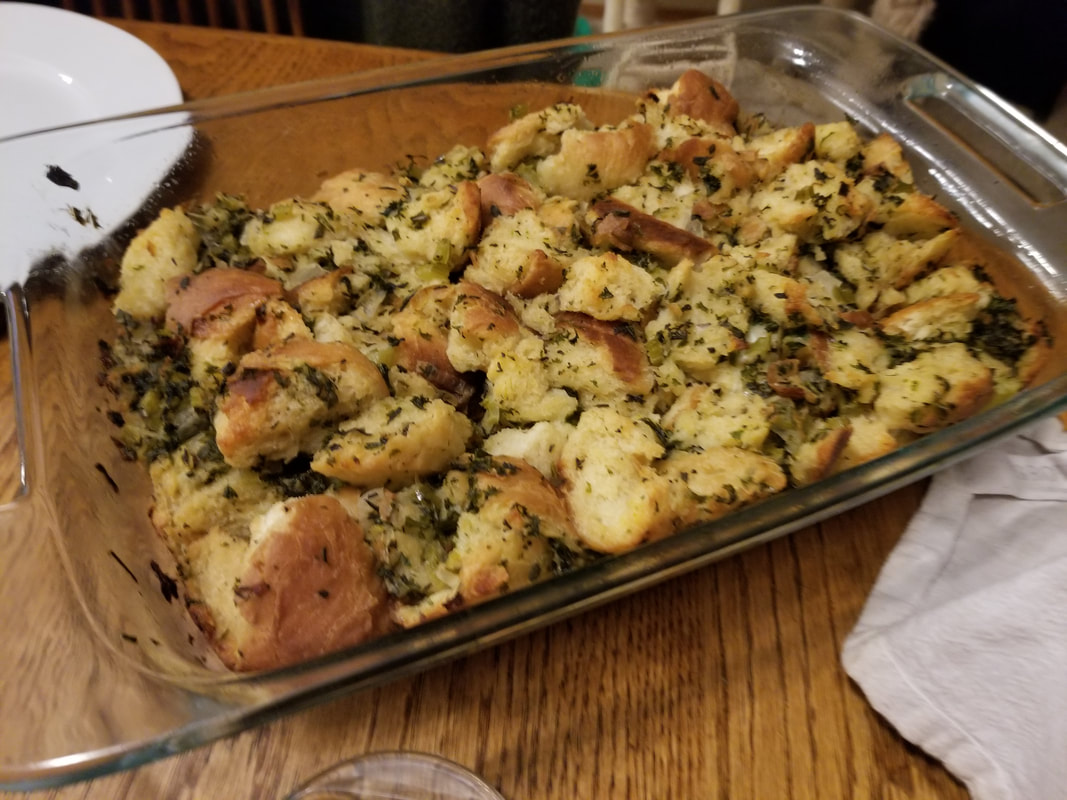
This dressing recipe is fairly standard except for the addition of the serrano pepper to add a little bit of kick to the background. Don’t worry about it being too hot! The bread, butter, and other herbs help tone it down, so if you ever pull this one out for another holiday meal, you don’t have to worry about blowing out the taste buds of the kids at the table. I made my own bread because I’m a fancy kid, but you don’t have to do that at all. Going store bought will take some of the pain out.

Ingredients
  • 1 lbs good quality white bread, homemade preferred
  • ¾ cups of butter
  • 1 large yellow onion, chopped
  • 2 celery stocks, finely chopped
  • 1 serrano pepper, finely diced
  • 2 and ½ cups chicken stock
  • ½ cup chopped parsley
  • Rosemary, sage, thyme, chopped together finely, to equal about ¼ cup
  • 2 and ½ cups of chicken stock
  • Salt, pepper
  • 2 large eggs

  1. Preheat your oven to 250 degrees fahrenheit. Tear bread by hand into manageable chunks and spread onto a foil lined baking sheet. Arrange neatly in one layer. Warm in the oven for an hour, removing the pan to stir the bread around occasionally. 
  2. Toward the end of the cooking time, chop your onion, celery, and serrano pepper. Melt your butter into a large saute pan and add your vegetables when it has melted. Cook down for about ten minutes or until the onion is translucent. Chop up your herbs while this process is going on. Stir the veggies when you have the chance.
  3. Add your bread, veggies, and herbs into a large bowl and combine to coat the bread evenly. Then begin to stir in the first 1 and ¼ cups of stock. Allow to cool and for the bread to soak up all that goodness.
  4. When you’re ready to cook, preheat your oven to 350 and prepare a 9x13 baking pan with butter or nonstick spray. Set aside.
  5. Whisk together the remaining chicken stock and two eggs. Pour over your bread and herb mixture and stir to combine before adding into the prepared baking pan. Spread evenly inside the pan.
  6. Bake covered in foil for 40 minutes. You can remove from the oven and keep in the refrigerator for up to a day ahead of the meal at this point, or you can remove the foil and continue cooking for another 40 minutes until the top is golden brown. If you’re cooking it from refrigerator temperature, you may need to extend your second cooking time to about an hour.
0 Comments

    Archives

    February 2023
    November 2022
    October 2022
    July 2022
    May 2022
    April 2022
    January 2022
    November 2021
    May 2021
    February 2021
    January 2021
    November 2020
    August 2020
    July 2020
    June 2020
    May 2020

    Categories

    All
    Apples
    Breakfast
    Chicken
    Cold Weather Food
    Cookies
    Desserts
    Dips
    Drinks
    Fall
    Football Food
    Holiday Sides
    Market Meals
    Meat
    Mushrooms
    One Pot Meals
    Sauces
    Saving Taco Bell
    Sides
    Soup
    Thanksgiving
    Thanksgiving Leftovers
    Vegetarian

    RSS Feed

Proudly powered by Weebly
  • Home
  • Support Us
  • Recipes
  • Restaurant Reviews
  • Writing
  • Cookbook of the Month
  • Archive